Point List Dialog
The Point List Dialog provides you with a means of establishing points of interest in your Map Window using symbols of your own choosing, along with a label. Additionally, you might add a fix to the label showing the latitude and longitude of the point. You can add a single selected point, or you can add all of the points listed in the dialog in batch mode (add all the records at the same time). In most instances, the data will originate from the attributes of the original 1715 Fleet maps as extracted using the Data Utility but you can use any delimited text file you like, so long as the records are identical in series meaning that the same ditem is found in each record by position. The Point List Dialog expects the records to be in uniform layout, and will not work properly in batch mode if all of the records are not uniform in this regard. Typically, the Data Utility List extracts up to ten fields, or ditems, per attribute, those being:
- Tag Number
- Description
- Vessel
- Quantity
- Year Found
- Latitude
- Longitude
- Site
- Date
- Depth (if provided)
Required Coordinate Values
The Point List Dialog can pinpoint positions in DigFindR's Map Window using latitude and longitude values in that order. The latitude and longitude must be expressed in decimal minute notation using numerals only. Optionally you may use raw feet positions in lieu of latitude and longitude if that is necessary. The Point List Dialog can correlate the two.
If, in fact you have position fix data in another format, such as sexigesimal (degree, minute, and second), you can use the Fix Dialog to interpolate.
The image map of the Point List Dialog shown below is linked to subject material describing the functions of the Point List Dialog. Click on the image map for explanations:
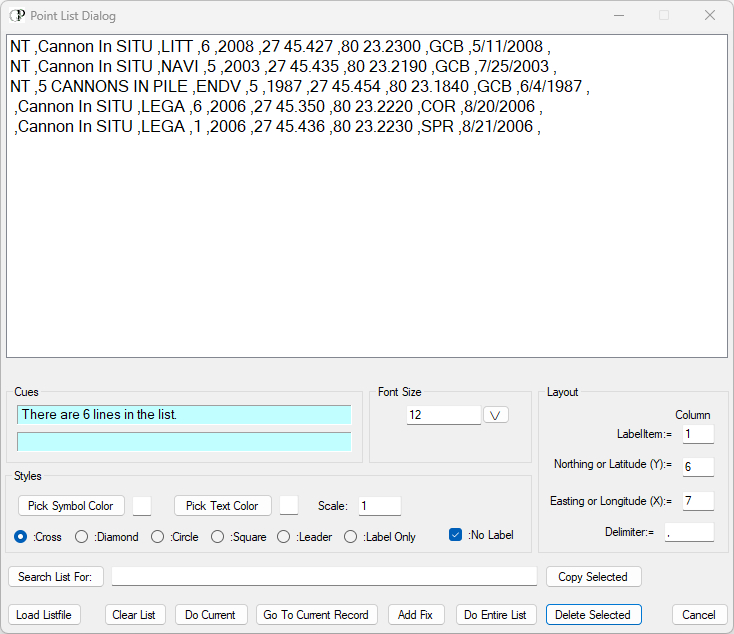
Data View
The window displaying your listed records is seen in this example with four records. If there were more than twelve records, a scroll bar will appear on the right side of the Data View. If your record strings are longer than the Data View is wide, a scroll bar will appear at the bottom of the Data View. The Data View is a list only; you can not edit the data in the Data View.
Cues
There are two text boxes in the Cues; the topmost tells you how many records are found in the current file being processed, while the lower one will give you an indication of which record is being processed when you execute the Do List or Do Current function.
Font Size
Use the drop down list to change the size of the font in the Data View window.
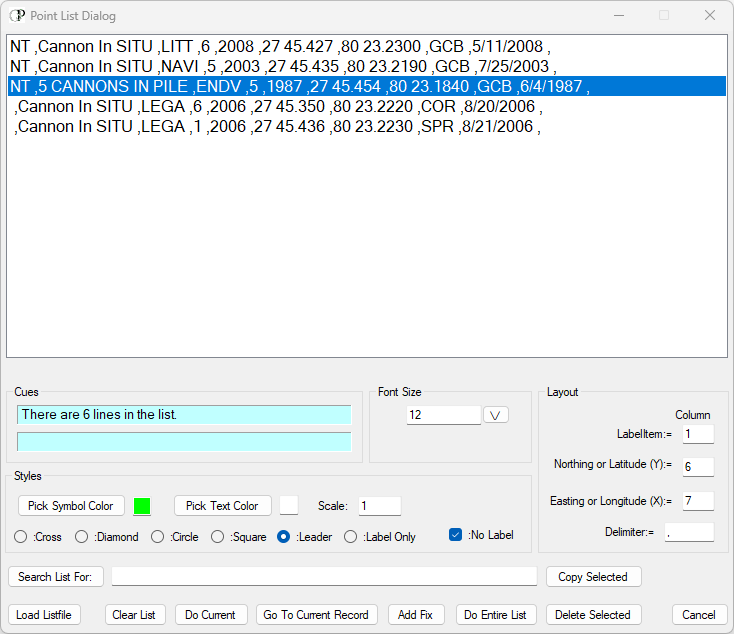
Styles
You setup the style of the symbols you want to place into the map using the choices in the Styles control collection. There are five primary styles as indicated by the five radio buttons. These can be adjusted by color and size (scale). The default size/scale is 1. You can also pick a color for the label text. When you click on the Pick Symbol Color button or the Pick Text Color button a Color Dialog will appear and you can select the color you want using that dialog. If you don't pick colors, the symbol and the text label will be white.
There is a check box for "No Label". If you check that, the Point List Dialog will not put a label on the symbol.
You can re-process the entire list, or a single record as many times as you like, changing the colors, symbols and scale to further stylize your symbols.
Once a symbol is in the drawing, you can add the Latitude and Longitude Fix to the symbol by clicking on the Add Fix button. Be aware that you can only do this one symbol at a time.
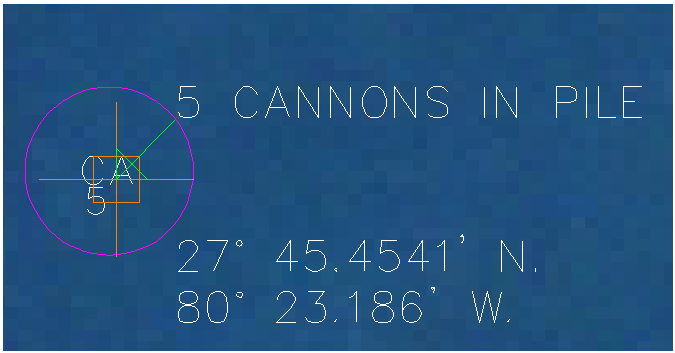
The best practice is to add these new symbols on a separate layer, so they may be easily hidden from view through the visibility property of their layer. See the example below.
Using the Point List Dialog, the second record was processed individually using the Do Current button.
First the Square symbol was added using the orange color and then the green leader line was added
along with the 2nd ditem in the record as a white label. Thereafter the position of the symbols was
added using the Add Fix button. All symbology was added at a scale of 2 as seen below:
The symbols are shown below at the same scale. The CROSS is a little larger than the other four. The
LEADER symbol is designed specifically to point a LABEL to the fix position.

Layout
The Point List Dialog will place symbols and labels into the Map Window according to the ditem series specified in the Layout. By default, when you first open the Point List Dialog, the Label Item will be expected to occupy the first position in the record string (always reading the string from left to right, not right to left). By default, positions are separated by commas as noted in the Delimiter box. Latitude is expected to be in the sixth position, and longitude is expected to be in the seventh position. Be aware that you can make changes in the Layout by changing any of the values. For instance, you might want the ditem in the second position to be the label in this illustrated example, instead of the first ditem. You make these adjustments according to the data you are using. In all cases you must make sure that you have correctly indicated which ditem is latitude and which ditem is longitude, otherwise your fixes will be put your symbols in other locations around the globe.
Search
You can find specific records in your Data View by providing a search string in this box and clicking on the Search List For: button to the left. Be aware that this is a case sensitive search, meaning that "Cannon" will not return records that use the word "CANNON", nor will the search term "CANNON" return records containing the word "Cannon". Once records are found, they are highlighted. If your data list is extensive, you will probably have to scroll through the list to find all of the records that match your search string. The intention here is to provide you with a means of symbolizing particular records in the Data View, one at a time.
Copy Selected
Copy selected line(s) to the clipboard.
Load List file
Use this button to open a File Open Dialog where you choose the data file you want to process with the Point List Dialog.
Do List
If you want to process the entire contents of the Point List Dialog's Data View in batch mode, click on this button. All records will be added to the map using the symbols and labels (if desired).
Delete Selected
Delete selected line(s) in the Data View window.
Do Current
If you only want to add a single symbol for a single record in the Data View, use this button. Be aware that once the record is added to the Map Window, the zoom function activates automatically so that you can see the results... however, you might have to move the Point List Dialog out of the way, or minimize it to the Windows Task Bar to see the the new symbol.
Clear List
You might have several data files you wish to process. Use this button to clear the Data View so that another data file can be loaded.
Go To
You can select a single record in the Data View and click on this button to zoom to that record's geographic position in the Map Window.
Add Fix
Normally, text labels are added to symbols in DigFindR in the upper right corner of the symbol, however you can add the fix to a symbol in the Map Window using this button and the fix will be added in the lower right corner. If you've added a label to the symbol, this fix will balance with that label as seen in the previous illustration.
Cancel
Use the Cancel button to exit the Point List Dialog. Be aware that when you do this the Data View is emptied and your Styles setup will be lost.